
An example of how to create a freelance invoice
The UK has the second fastest-growing pool of freelance workers in the world behind only the US, according to freelance organisation IPSE.
That means more and more people are keen to roll their sleeves up and be their own boss. Yet, with the flexibility of working for yourself comes the responsibility of looking after your own admin – and that inevitably involves creating and sending invoices to clients to make sure you get paid correctly and on time.
For those freelancers who aren’t necessarily detail-oriented or keen on mundane tasks – however crucial those may be – this can be an off-putting prospect. However, drawing up an invoice is easier than it sounds if you follow a logical approach.
Let’s take a step-by-step look at a freelance invoice creation using an example. Jill is a 45-year-old freelance bookkeeper who recently started her own business to get away from her humdrum life in the city.
The time has come for Jill to fire off her first monthly invoice to her founding customer, food delivery firm Paul’s Pizza. Here’s what Jill needs to do:
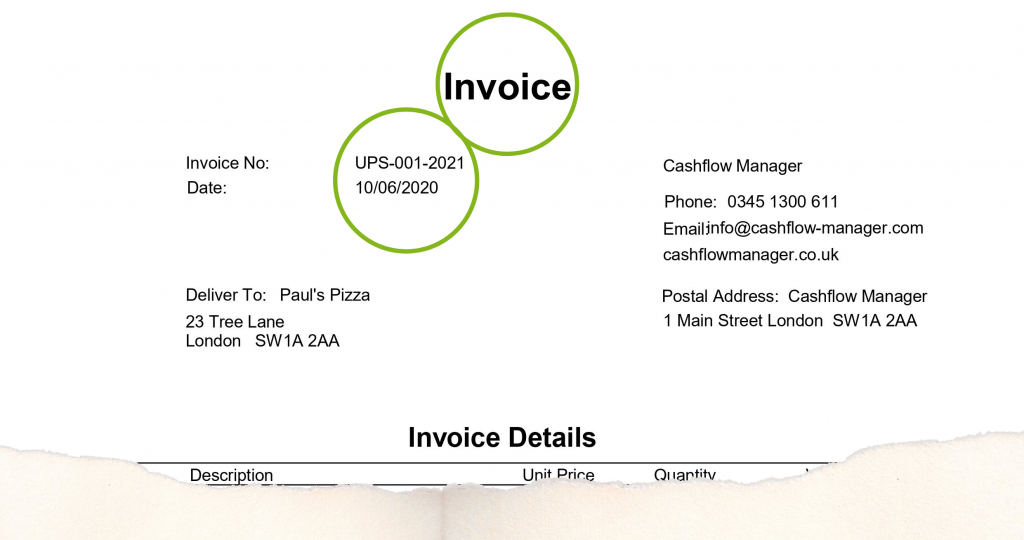
Step 1: Starting from the top
Begin with a simple label at the top of the page: ‘Invoice’. This sounds so obvious, but Jill knows that when a finance team is thumbing through a pile of paperwork, any descriptor that draws the eye is vital.
Still up top, she needs to add her full contact details (you can also include your customer’s address if you like), date of distribution and an invoice number. This should be unique to her business and can be any combination of letters and numbers that makes sense as the start of a system. For example, the name of the client followed by the number of the invoice in the sequence, and the current year.
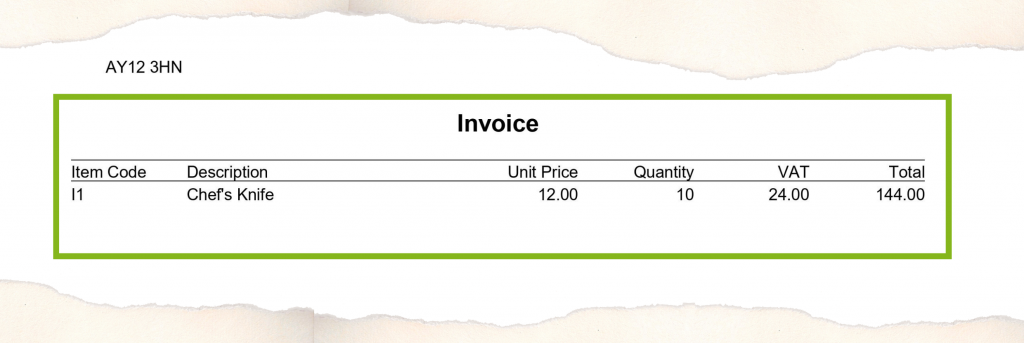
Step 2: Detail your work
Next Jill needs to add an itemised list that details all of the work she has completed in her latest invoicing period, centrally on the page.
This is so the finance/accounts team can identify the document and solve any problems with the payment process that may arise once it has been submitted.
If you are invoicing for a project fee, give a short and snappy overview of the work; one line is enough.
If – like Jill – you regularly deliver the same type of work or product for your customer, and invoice at the same time each month, you may be able to repeat the description included on the previous invoice – so long as the date is logged accurately.
When you have added the descriptor for your work, you should also include the quantity and price for each entry. If there are multiple entries on a specific invoice, include the total fee.
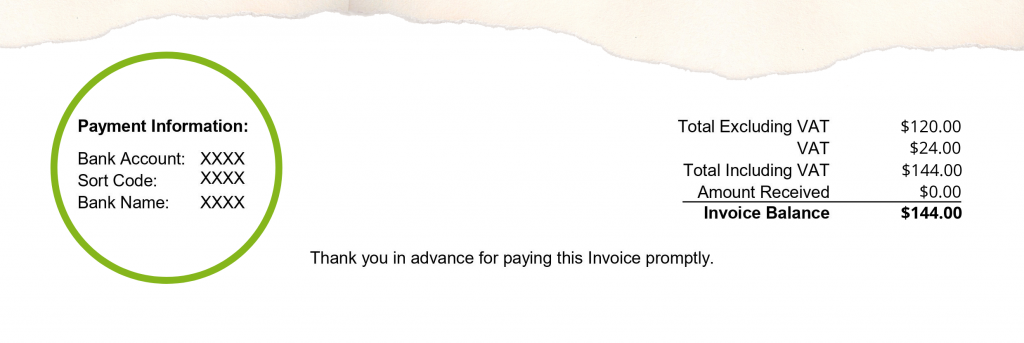
Step 3: Make sure you get paid
Finally, Jill ensures the pizza company will pay her correctly by clearly displaying details of the bank account, sort code and bank name, and checks them to avoid problems. You can also add your payment terms – 30 or 60 days, or another period you have agreed with your client – here or elsewhere on the page.
By now, Jill has realised in this example that creating a freelance invoice can really be as easy as one, two, three, and is ready to watch the dough roll in from Paul’s Pizza and her other clients with minimal fuss as she gets on with her work.
For an even more comprehensive look at the payment terms mentioned above, as well as more details on what information to include and some ideas about design, check out our blog on how to create of a template to use for all of your invoices.
Try our free, no-obligation 30-day trial today (no credit card required).


Leave a Reply