How to Make a Self Employed Invoice Template
The pandemic is reshaping the workforce, with more than 2.2 million people now classing themselves as freelance. From bakers to shoemakers, designers to database administrators, and technologists to translators, that’s a vast self-employed army.
An astonishing 49% of UK workers carried out at least some freelance work in 2020, an increase of 3% on 2019.
What’s more, this segment of the UK market is growing almost as fast as it is anywhere else in the world. Fintech Payoneer states UK freelancer revenues are growing 59% year-on-year, second only to the US at 68%.
Against this backdrop, many people will find the freedom of being freelance thrilling – but there’s more to flexible labour than simply getting the job done.
In fact, there are a myriad of financial aspects of the freelance working life to consider, and ideally you should do so before taking the plunge.
Not everyone can afford to pay an accountant to take care of tricky tasks such as completing a tax self-assessment form. Even basic paperwork that’s actually crucial, such as creating and sending an invoice to a client for completed work, can appear complex if you haven’t done it before.
Banish your billing bugbears
But the truth is, if you’re self-employed and you don’t get an invoice in the system at a time that suits the client as much as it’s convenient for yourself, you could be left out of pocket by delayed payment.
In fact, according to freelancerclub.net, one in 10 freelancers has struggled to settle monthly bills because of late invoice payment.
Of course, drafting the ideal invoice when you’re self-employed is not just a case of filling in your fee. Many other crucial pieces of information must be added if you’re to be paid on time, in full, and to the correct bank account.
Let’s take a closer look at the steps you need to take so that you can create, customise and send customer invoices – and what you need to include.
Including the right information
1) Firstly, it’s a good idea if you’re self-employed and setting up your business with a new client to double check when they want you to invoice. Over time, as you hopefully get used to working together, this may change. But to begin with, your customer may want you to:
- Invoice upfront, before you start the work (giving both parties protection over the price and payment)
- Invoice partway through the work, or regularly if your arrangement is a monthly retainer
- Invoice on completion of the work – while this delays payment to your account, it also gives you the option to requote to add any extra work to the fee, if it wasn’t in the original work schedule
When you’re self-employed, knowing when to invoice is important so it flows through your customer’s accounts system, ensuring you get paid in good time, and allows the client to stick to their own cashflow strategy.
2) It might sound simple, but adding the word “invoice” at the top of your document – and in the subject line of your covering email – makes it more noticeable for busy accounts teams (and it’s also easier to find in an electronic document search).
Another aspect to remember is a serial or unique identification number. This can be any combination of letters and numbers that makes sense as the start of a system – it’s your choice. For example, the name of the client followed by the number of the invoice in the sequence, and the current year: UPS-001-2021.
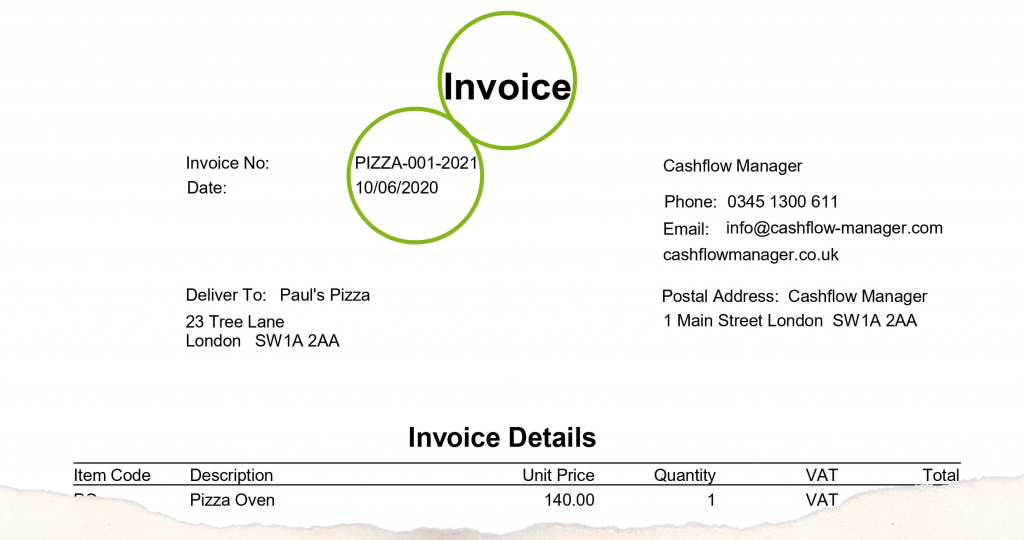
Following a convention such as this will make it easier for you to file and find invoices as you build your small business, and work with multiple customers.
3) Next comes company information and postal addresses.
Just as you would if you were writing a formal letter, it’s important to include your company’s name, address and contact details – usually in the top right-hand corner of your invoice.
Separately, opposite to this information and in the top left-hand corner of your document, add your customer’s company name and address. Here, it’s sensible to write the name of your contact – this can be your direct client, or the accounts team member who looks after you – so that it finds its way to the right person.
At this point, if you are a limited company rather than a sole trader, you should write in your company registration number, and formal registered company name.
4) Whether your customer is a large or small business, it is vital to display the details of the work you are completing for them.
This is simply another way for all involved in the invoicing chain to identify your document and solve any problems with the payment process that may arise once it has been submitted.
The description of your work will of course change from one job to the next.
If you are invoicing for a project fee, give a short and snappy overview of the work; one line is enough, as long as it demonstrates the nature of what you’re doing.
If you regularly deliver the same type of work for your customer, and invoice at the same time each month (for example), you may be able to repeat the description included on the previous invoice – so long as the date is logged accurately.
When you have added the descriptor for your work, you should also include the quantity and price for each entry.
If there are multiple entries on a specific invoice, make sure you have added these up to create a total fee – which you can consider highlighting in bold or bigger text.
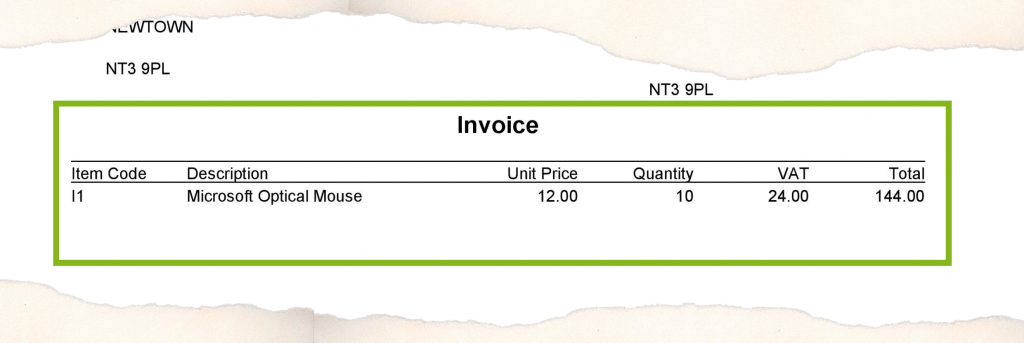
5) You may wish to discuss with your client whether VAT could or should be added to the overall cost of the work you are supplying.
To add VAT your business will need to be VAT registered – more details of which can be found via the website of HMRC. In these instances, you must also include your VAT registration number somewhere on the invoice.
If you are supplying overseas customers, or smaller companies that may not be VAT registered, you should investigate possible issues before sending your invoice.
The UK VAT rate currently stands at 20% of the cost of services provided – with a regularly reviewed minimum threshold where companies must apply VAT – and it should be displayed additionally to your overall fee.
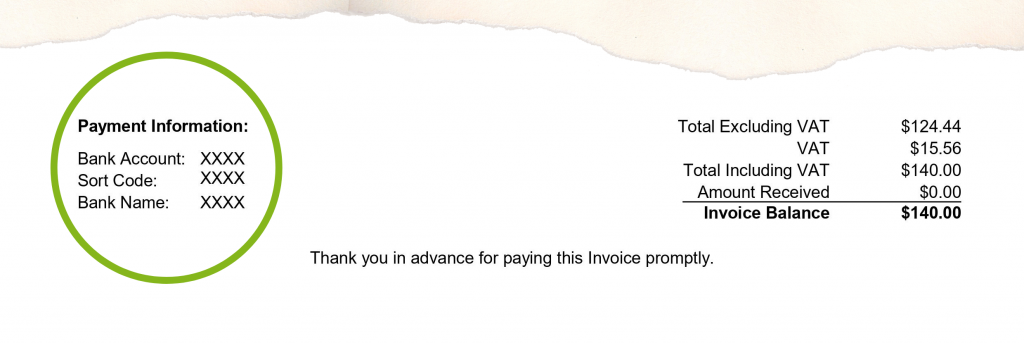
6) If you want to get paid, in full and on time, then of course it’s vital to include your account details.
Clearly display your bank account, sort code and bank name to avoid delays in your customer settling your invoice.
7) As mentioned above, few things in invoicing are as crucial as accurately recording dates. There are several dates that come into play for every invoice you create:
- The supply date of the goods and services you are providing – commonly added to the description section of an invoice
- The date the invoice was created – often included at the top of the document in the section marked with your company’s address and contact details
- Expected payment date
The latter element – expected payment date – is a key consideration and one that is often tricky to get right.
Also known as “payment terms”, this is the maximum period you choose, in which your customer should settle your account before you start chasing payment (“credit control”). Having payment terms in place should help your business maintain a healthy cash flow because it generally encourages quicker payment.
We won’t go any deeper into chasing late payment, or possibly applying late payment charges, here. However, whatever you choose as your acceptable payment period, displaying the date on your invoice lays down a marker of understanding between your business and your customer.
There is no need to feel worried about discussing your payment terms with your customer before sending the invoice (whether they do actually pay within your preferred window is a different matter!).
Give your invoice the professional touch
Having gathered and entered all of the necessary information, you’ll want to make sure that it’s well set out, in a logical order and with a design that’s easy to follow.
There are multiple ways to create your invoice, from a simple, unheadered document to fancier formats that will help your business stand out from the crowd. With hundreds of invoices competing for attention, being recognisable can be important.
Choosing an invoice format that is professional in its appearance showcases your venture in a respectable light; but it also allows hard-pressed accounts teams to easily find the information they are after.
Ultimately, that means you’ll receive fewer queries from your customers, and you’re more likely to get paid on time.
Now it’s time to send your invoice
If winning work is exhilarating, sending your first invoice when you’re self-employed (and each one that follows!) is just as satisfying; a confirmation that your services are sought after and your business is doing well.
The simplest and most efficient way to send an invoice is by email. You can attach the document – preferably as an uneditable PDF to prevent changes being made.
Remember to include a clear, brief description of your business and invoice in the subject line of the email, and add a covering message. Some things to include here are:
- Named recipient/s (matching the name or names in the customer company contact details section of the invoice)
- A few words of description about the work – again, this will aid any searches for the document which need to be made as your invoice is processed for payment
- Your own contact details for ease of reference
- Don’t forget to thank your customer for the business – a little gratitude can go a long way to winning repeat projects!
It’s important to remember that different customers and clients may well have different systems that they like to follow with regard to receiving invoices.
Before you first send an invoice to a customer, therefore, contact them so you can understand the best person to send it to and how they prefer to receive it.
Some firms will have a dedicated recipient for all invoices who works in accounts; others like it to be sent first to the person you deal with on a day-to-day basis so they can approve payment; and many companies are beginning to use automated systems that handle at least some of the work involved in invoice processing and payment.
There is nothing worse than waiting for a while to get a response, or indeed payment, then realising or discovering that you sent the invoice to the incorrect person in the first place.
This can be immensely frustrating for you and your customer, who may want to “close the books” on a certain accounting period but can’t because your invoice never reached them.
(If in doubt, you can always send the invoice to several people, just to make sure it gets there – but to reiterate, it makes the most sense to check the right recipient before pressing “send”.)
What to do after sending your invoice
While almost a third (30%) of invoices are not settled within agreed payment terms, according to Disputes Register, following the steps set out here will at least reassure you that you have done everything possible to ensure your customer transacts on time.
If in doubt about a delay, don’t be afraid to send a gentle reminder – perhaps redelivering the invoice along with your message.
Make your own life easier
If creating, managing and sending invoices is chewing up too much of your time when you’re self-employed, don’t worry; there are resources out there to help make the process easier.
You can save yourself both time and stress by automating much of the invoicing process by using accounting software that has been designed specifically for small, micro businesses, and sole traders. Software such as the Cashflow Manager can quickly create invoices for customers and track money owed.
The inbuilt Invoice Manager has ready-to-go templates that can be used straight away or customised to give you professional invoices in minutes. Also, if you’re VAT registered, then Cashflow Manager can help with your reporting requirements.
Online and over-the-phone tech support can also help take the sting out bookkeeping and help you get back to doing what you do best – running your business.
Start a free, 30-day trial of Cashflow Manager today. No credit card required.


Leave a Reply